Thursday, January 22, 2015

Rick O'Connell Shoulder Holster How-To and Resource Guide


A friend of mine asked if I could make him a shoulder holster vest like the one Rick O'Connell wears in The Mummy. 


Despite not having a clue how to make something like that, I'm fairly pleased with the way it turned out.   It's not quite screen accurate, but I like the way it looks :)


 I took a lot of photos along the way, so if my finished product turned out okay I could share the process with you all on here.  I'll also provide links to the materials and tools I used. 

This was a relatively easy project and fairly inexpensive.  I spent $36.18 on this.  You can easily make this in a day, and depending on the tools you already have for about $30-$45.

Here's a list of materials and tools I used to make this and where you can find them:


 For this project I had to purchase:

Fabric  (1 yard: $18.72)
I did not do this in leather, but rather vinyl upholstery fabric.  I did this mostly to cut back on cost.  But the lighter material was also easier to work with.
This was the most expensive element.  This fabric is 34.99 a yard, so it's a good idea to use a coupon.  If you haven't already, sign up for e-mails/texts from Joann's.  Also get the app.  And visit the webpage before your check out.  There are often different coupons available on each.  Joann's will let you stack them most of the time.  They will also honor Hobby Lobby coupons.  There's a 40% off coupon for regular priced items every day.  You can get that through the Hobby Lobby app.
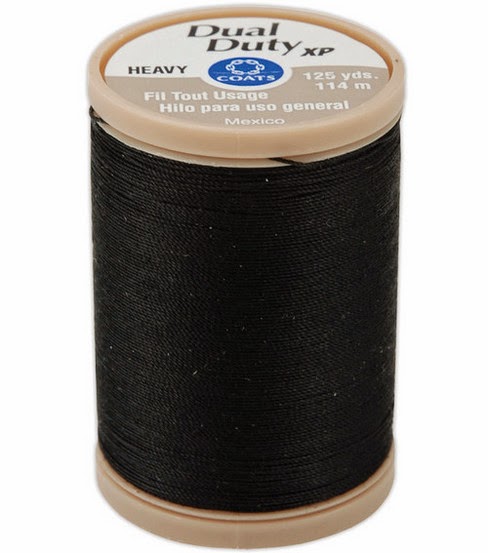
Thread ($2.29)
Get this thread in the accent color you want.  I used heavy cream. I only used this for stitching the edges of the actual holsters together.  You want to use a heavy thread since you're using a heavy material.  I thicker thread will also look better as an accent, as you can see it better.

Leather Lace ($2.29)
This I used to tie the pieces together.  There was very little stitching on this project.

Leather Dye ($4.49)
This is not necessary, but I purchased this because the material I got was lighter than I wanted it to be.

An Awl ($4.22)
This you will need to poke holes through the material for the rivets and the lace.


Things you will also need that you may not already have:

Rivets($3.49)
You can actually make this without the rivets.  They only hold the back straps in place.  You could use literally anything...Stitches, velcro, snaps...whatever you like.  I liked the way the rivets look so I used rivets.  If you don't want to use rivets here, then there is no need for the rivets or the rivet setter and anvil.


You will need this tool to set the rivets, if you choose to use rivets in your piece.

Any time you are sewing with a heavy fabric like upholstery vinyl, leather, denim, etc...you want to make sure you use an appropriate sewing needle.  As indicated by the packaging, this set of needles is good for leather and leather-like materials (such as upholstery vinyl)  Your standard sewing needle is not made to go through heavy fabric and may (probably) break.


I was lucky enough to be able to borrow these items from a friend.  However they are nice to have, and not terribly expensive if you have to purchase them on your own.


So the process was actually pretty easy.  I used some reference photos and got a general idea of the shape of the pieces.


Then I sketched them out to approximate size on wax paper.  Then I taped them together to make sure the fit okay.  Made some adjustments.  And when I was happy, I used the wax paper pieces as pattern pieces for the actual fabric. It's a good idea to do this step first because this fabric is kinda pricey.

After I cut them out I used masking tape to hold them together and try them on again and make sure everything still looked right.  I did leave a little extra length on the parts so I had room to adjust.  Since this was being made for someone else.  Then I laid them out and dyed them to get to the color I wanted


The dye is really messy so I covered the surface I was doing this on with tin foil because the dye will just soak through any type of cloth you put down.  And it stains bad.  I did 2 coats of dye and let it dry.  It doesn't take very long...maybe an hour.  Beware though, because this is not real leather and it doesn't absorb the dye like leather would, the stain will rub off on our hands a bit still when you are working with it.

Since I was making this for another person, I waited until I had a chance for him to try it on before I started poking holes in it and tying things together.  Once I made adjustments I started putting the pieces together.

I used the awl to poke holes in the pieces big enough to thread the leather lace through and just tied the pieces together as they are in my reference photos.  I poked a few more holes above them to make it look more like the reference photos as well.

 The tape is what I was using to hold it together temporarily so my friend could try it on.  I made sure to mark where the pieces fit with an erasable marker. 

You can see in this picture that the pockets are folded with the inside facing out.  This was actually an accident.  However, it worked out well because I then stitched another layer of fabric going the right way over the top.  This reinforced the pockets by acting as a sort of lining and made the fabric sturdier.  Since the fabric is pretty flimsy by itself, when you put a gun in there without that lining, it just kinda flopped around.  So yay for happy accidents!


Next was to cut out the outer layer of the pockets and stitch them together.  I just traced the pocket on the fold of my remaining fabric and cut it out (and then dyed it)

I gave myself a little extra space on the edges just in case.  Then stitched them together.  The last part was to put rivets in the straps on the back to hold them in place.  Then I took a blow torch around the edges.  This burnt away any frays and thread that was still sticking out and also added some wear and tear to the overall look.  And that's it!  I hope this is helpful if you are trying to make this or something similar :)


Sunday, August 31, 2014

Sub-Zero Elsa Progress Tutorial: Armor


Sub-Zero Elsa CosplayTutorial: The Armor


The Sub-Zero Elsa cosplay I did for GenCon was a lot of fun because I designed the costume which gave me some creative freedom.  I still may make some tweaks to it yet, but it came together quite nicely.

The mask and the wig were the most important parts of this cosplay because they are the most iconic.  I do have a tutorial on how I made my mask here

Sadly, I do not have a tutorial on the wig.  But I used Tauriel from Arda Wigs in titanium blonde.  However, I would recommend Suzi in the same color for an Elsa cosplay as it's already layered.  They were just out of stock when I bought mine. Tauriel is the same style, just not layered. 

And here's a video on styling the wig for Elsa's hair
On my wig, I used a fishtail braid and I made the top wisps more spikey because I thought it looked better with this mashup version of Elsa.


And now on to the armor!!


The armor I made for this was actually pretty simple.  Here I'll discuss the shoulder pads, ice gloves, belt emblem, and boot covers.


Belt emblem

For this I had a resin ring.  This was one that I had made for the tassels on my Princess Hilda cosplay, but didn't use.  But any type of ring shaped thing would work for this.  I cut out a piece of acrylic and glued it to the top.  Again, you could really use anything here.  Cardboard probably would have been fine.  Then I painted the whole thing blue.
I cut the Lin Kuei symbol out of craft foam and painted the pieces black.  Then I took those pieces and arranged them on the circle and glued them in place.


At this point, I had run out of hot glue so I actually ended up gluing them down with fabric glue.  Doing this, I learned something very useful.  The time of fabric glue I used dried with a clear watery look.  Perrrrrfect.  I shall use this to look like ice!  I painted everything a darker blue and covered with the fabric glue and let it dry.


After this, I added some shading and highlights and touched up a few places with fabric glue.  The speckled on some pure white paint with a sponge brush to give it a frosty look.


Shoulder pads

The shoulder pads are very simple shapes.  They are ribbed and painted to give them a frozen look.  I made these out of craft foam.  If you don't know, craft foam is invaluable to cosplayers.  It's inexpensive, lightweight, and flexible.  If you heat it up you can form it into shape and once it cools, it will maintain that shape.
The shoulder pads were very simple shapes and just curved around to fit my shoulder.  They took like 2 seconds to form, but we will come back to that.

So to start I cut out 2 pieces for each shoulder.  I marked where I wanted the ribbed indentations to be and then I sewed them together.  Yes, sewed...on my sewing machine.  This was partially because I ran out of hot glue and partially to see if it would work...it was probably completely unnecessary, but it did have kind of a cool effect.  I stitched around the edge and then along the lines I marked for the indentations.

After they were stitched together, I made my indentations.  I did this with an old soldering iron.  I just ran the soldering iron along the lines I made, melting the craft foam and creating indentations.


I painted them blue and airbrushed in some shading and highlights.  Then I took my fabric glue and spread it over the shoulder pads giving it an icy look and sponged on some white around the edges.

After all that, I used my heat gun and shaped them to fit my shoulder.  The shoulder pads attach to the tunic with Velcro.


Ice gloves

For the ice gloves I bought some really cheap arm warmers.  They're like long gloves without fingers.  And I got an aqua bluish duct tape and wrapped my arms in it.  I tried to make wrinkles here and there.  The idea was to make a jagged ice look.  I also took smaller pieces and wrinkled and folded them to add some jagged edges around the top and bottom of the gloves.


After this, I cut them off by cutting a zig zag line on the under side of my arm.  I trimmed up some of the jagged edges and added a few more.  Then sealed them with a few coats of spray on mod podge.  Then I airbrushed in some shadows.


And then some highlights


Then I sealed them again with the mod podge spray.  The mod podge spray I have is a pearlescent sealer.  So it gave them I nice shimmery look when they were sealed.


Boot covers

I didn't really get many progress photos of these, but the process was very simple.  I have these fierce boots that I came across at Goodwill a couple years ago.  I never wear them. Ever.


I found fabric that matched the suede on these boots perfectly.  I started out by taking some scrap felt fabric I had lying around and pinned it around my leg.  Marking where the back seam would be and drawing the shape of the top and bottom with a paint marker.  I cut this out.  Stitched it together and tried it on to make sure it would fit.  I didn't need to use stretchy fabric or a zipper. 
Then I did the same thing with the black suede fabric I got for the covers.  Pinning and stitching until they fit just right.

Then I cut strips of the fabric I made the tunic out of and folded them and ironed them to make a trim for the boots.  I fabric glued the trim on and BAM!  Boot covers


And just because I know some people are thinking it or wondering.  Yes...these shoes were wicked uncomfortable.  I mean...the devil..  Just the worst.  I'm not very good at heels to begin with, so these were not the best choice.  But look at them!  They're just such good looking boots!

I will most likely be purchasing different footwear sadly, or investing in some very nice insoles.  Hopefully the insoles...because I love these boots :)


So that was the process in making all that stuff.  Hope it was useful or at least interesting! ;)


Friday, August 29, 2014

Sub-Zero Elsa Progress Tutorial: The Mask


Sub-Zero Elsa Cosplay Tutorial:  The Mask


Hey all! 

So the Sub-Zero Elsa mashup cosplay I made for GenCon may possibly be one of my favorite cosplays to date.  I was in love with the idea of this mashup and I couldn't have been happier with how it turned out.

This progress tutorial will go over how I made the mask.  The armor and other pieces of the costume I will discuss in a separate post, here.


My original concept sketch


Hair and makeup test after the mask was finished


So making this mask was definitely trial and error.  All in all, though, I think it was fairly uncomplicated.

I started by making a cast of my entire head, so I'd have something to work on.  You can find my tutorial on the process I used for making the headcast here


So once I had a head cast I began by using wire mesh and forming the shape of the mask over the headcast.  This is the kind of wire mesh you use for sculpting and it can be found in craft stores around where the sculpey and clay is.


This is what I used.  Jo-Ann Fabrics: $6.99 (or $4.19 after my coupon)
I had to use tape to hold it up on the headcast, but the stuff was pretty easy to shape so it didn't take very long
Wire mesh has been shaped and the plaster strips are being prepared for the next step.


Once I was happy with the shape, I covered the mask in plaster strips.  This is basically a roll of gauze imbedded with plaster.  You dunk them in water and apply in layers.  When it hardens you have a nice hard shell.  I did a few layers of plaster strips and let it dry for a few hours.  Once it was dry I could pull it off and it looked like this.  (The wire mesh and the plaster shell are all one piece now, I did not separate them)


Then I moved on to sculpting a little more detail.  Initially I was going to use light modeling paste for this, as I was only planning on modifying this slightly.  Then I started having ideas so I actually ended up adding on top of this with sculpey.

Oh...and cutting little breathing holes...those are important!  I just used and x acto knife and made little slits


Then I baked the mask to harden the sculpey.  I sanded it a bit to smooth it out, and then it was paint time!

So first I painted it light blue, then added in some highlights and shadows.  It looked like this:


Unfortunately the colors didn't mesh well with the rest of the costume.  So I added more green to it. 

Now, since I wanted the mask to look like it was made out of ice, I thought a clever idea would be to coat the entire thing in a super high gloss sealer.  Then spackle some frost over it once it dried

That was a bad idea

So that idea did not work.  The gloss didn't really give it the look I was hoping for and furthermore, highlighted every blemish in my work.  The mask is one of the most important parts of this costume, if not the most important.  So it really needed to stand out and look great.  I hated how it looked at this point and was starting to get a little frustrated and worried.  So I put it up for the night.

The next night I sanded it down.  I sanded and I sanded and I sanded.  I sanded until all the paint was gone, and then some more.  I wanted it to be very smooth.  I hit it with a few coats of gesso and some sanding in between just to get things extra smooth.

The next day I gave another shot at painting this thing.  I decided to try my hand at airbrushing.  I really liked how the mask looked initially, but I wanted even smoother blending.  So I look across the room at the airbrush I've never used and decide today would be the day I learn how to use it.

This mask was probably a good piece to learn on since there isn't really any intricate details.  It's mostly just shading and contouring.  Here's how it looked after I was done airbrushing it:

 
And here's the first paint job again (before the glossy coat)


Yup!  I was much much happier this time.  I took a sponge brush and speckled in some pure white on the raised parts to give it a frosty look and it was done!


To complete the mask, I utilized the wire mesh to actually sew in elastic bands that would hold the mask on to my face.  Then I coated the inside with mod podge to seal in any loose plaster dust that was still inside the mask.  The stuff is not fun to breathe or to get in your eye (which is exactly where it goes when you exhale)

And there you have it!


Here's the link again to my headcast tutorial.


Here's a link to my armor tutorial